So this is a second try at doing the Galileo, working to (again) match and document the original studio model. The main goals of this model is to fix errors that cropped up in the first model and incorporate the new data on the studio model that I've gotten since that first build.
New Data
So we've gotten two important new data sources I didn't have before. A copy of the original decal sheet (which has let me do direct tracings of the graphics) and a shot of the starboard side of the studio model in it's original configuration.
Here is the new traced graphics compared to the graphics I used on my first model...
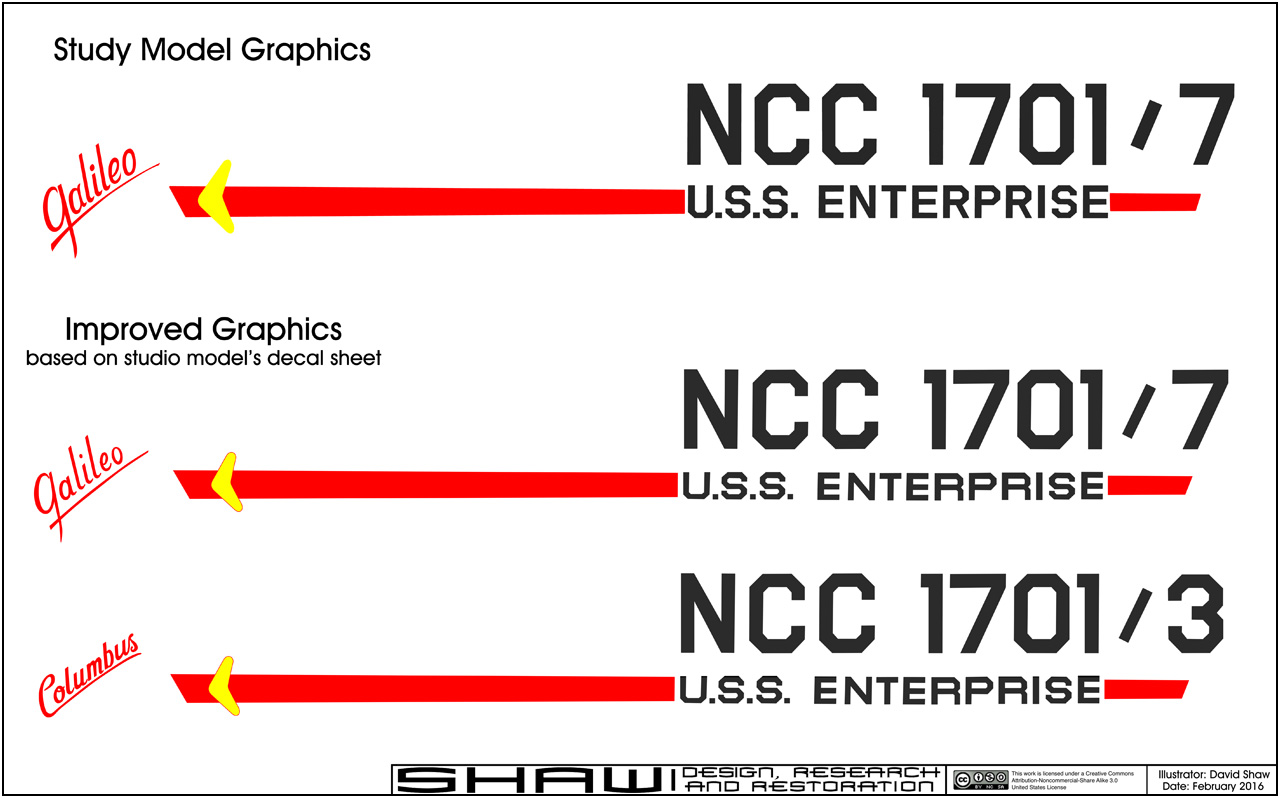
Click to enlarge
And a close up of the names...
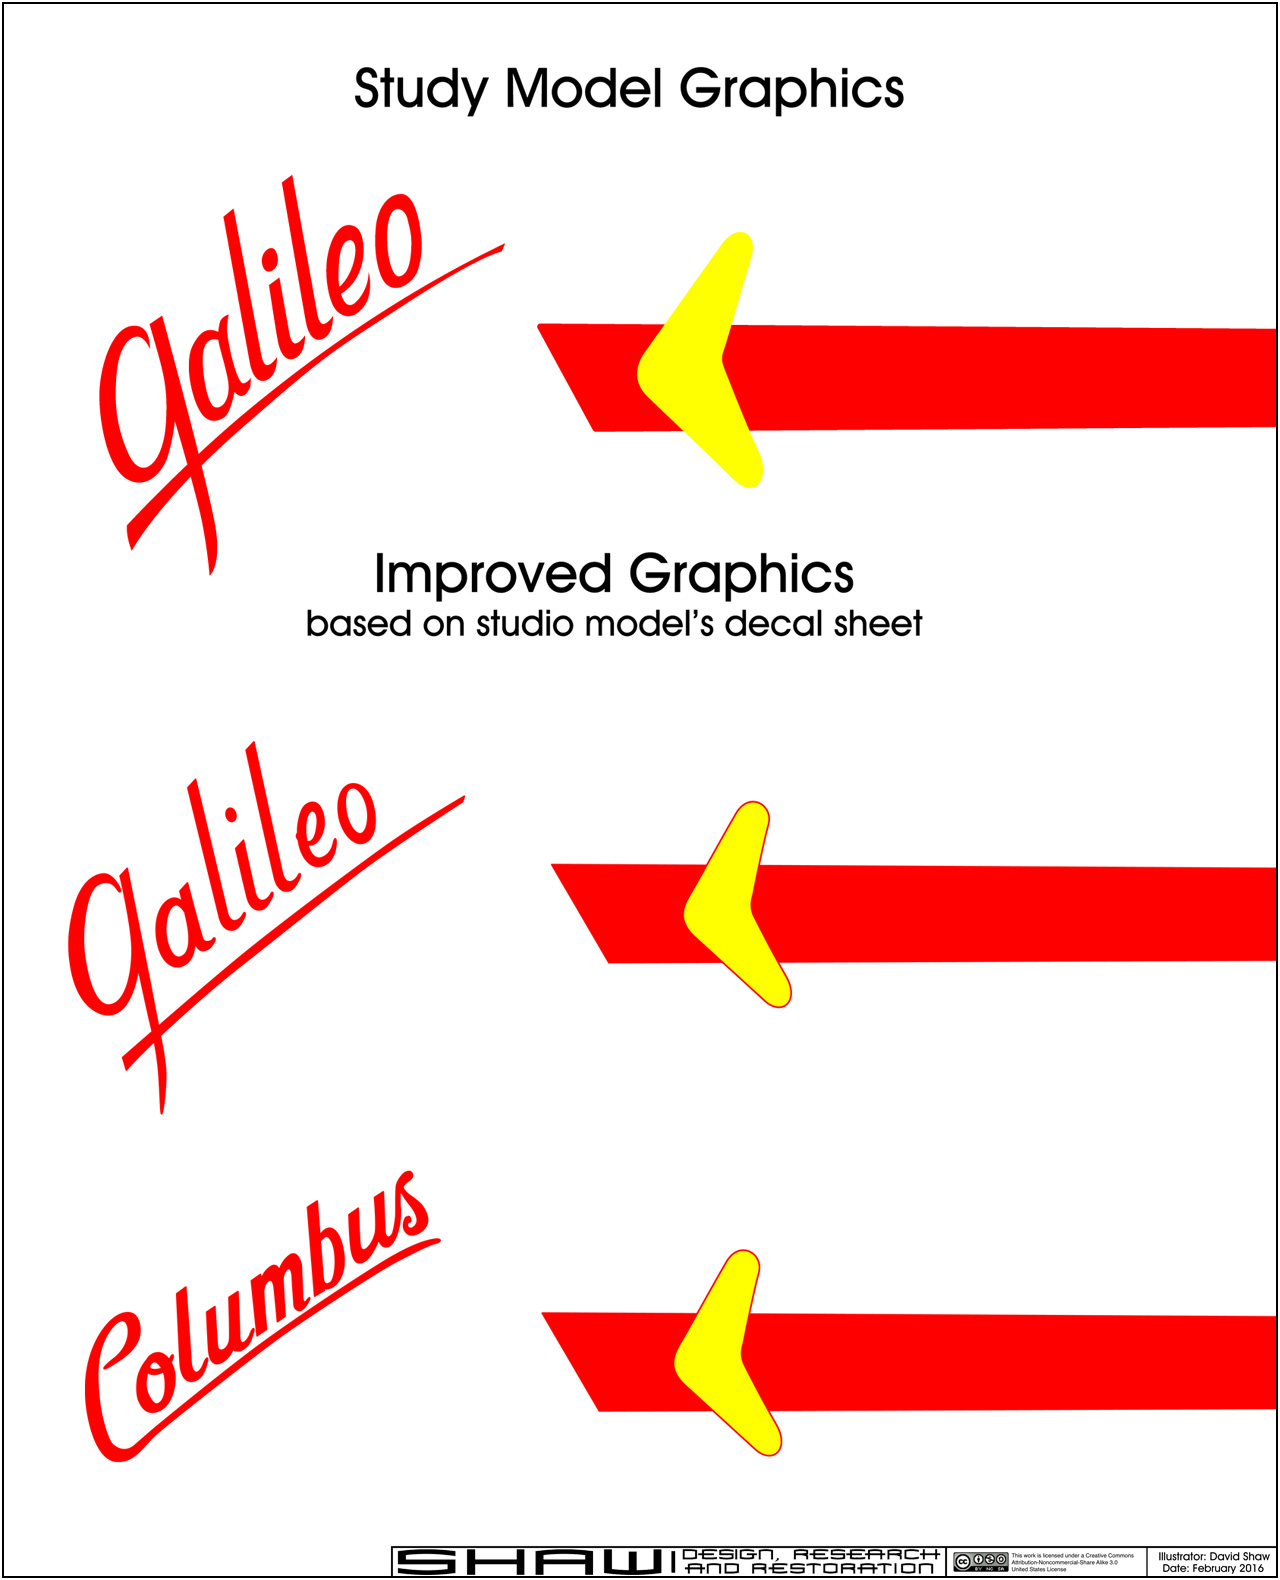
Click to enlarge
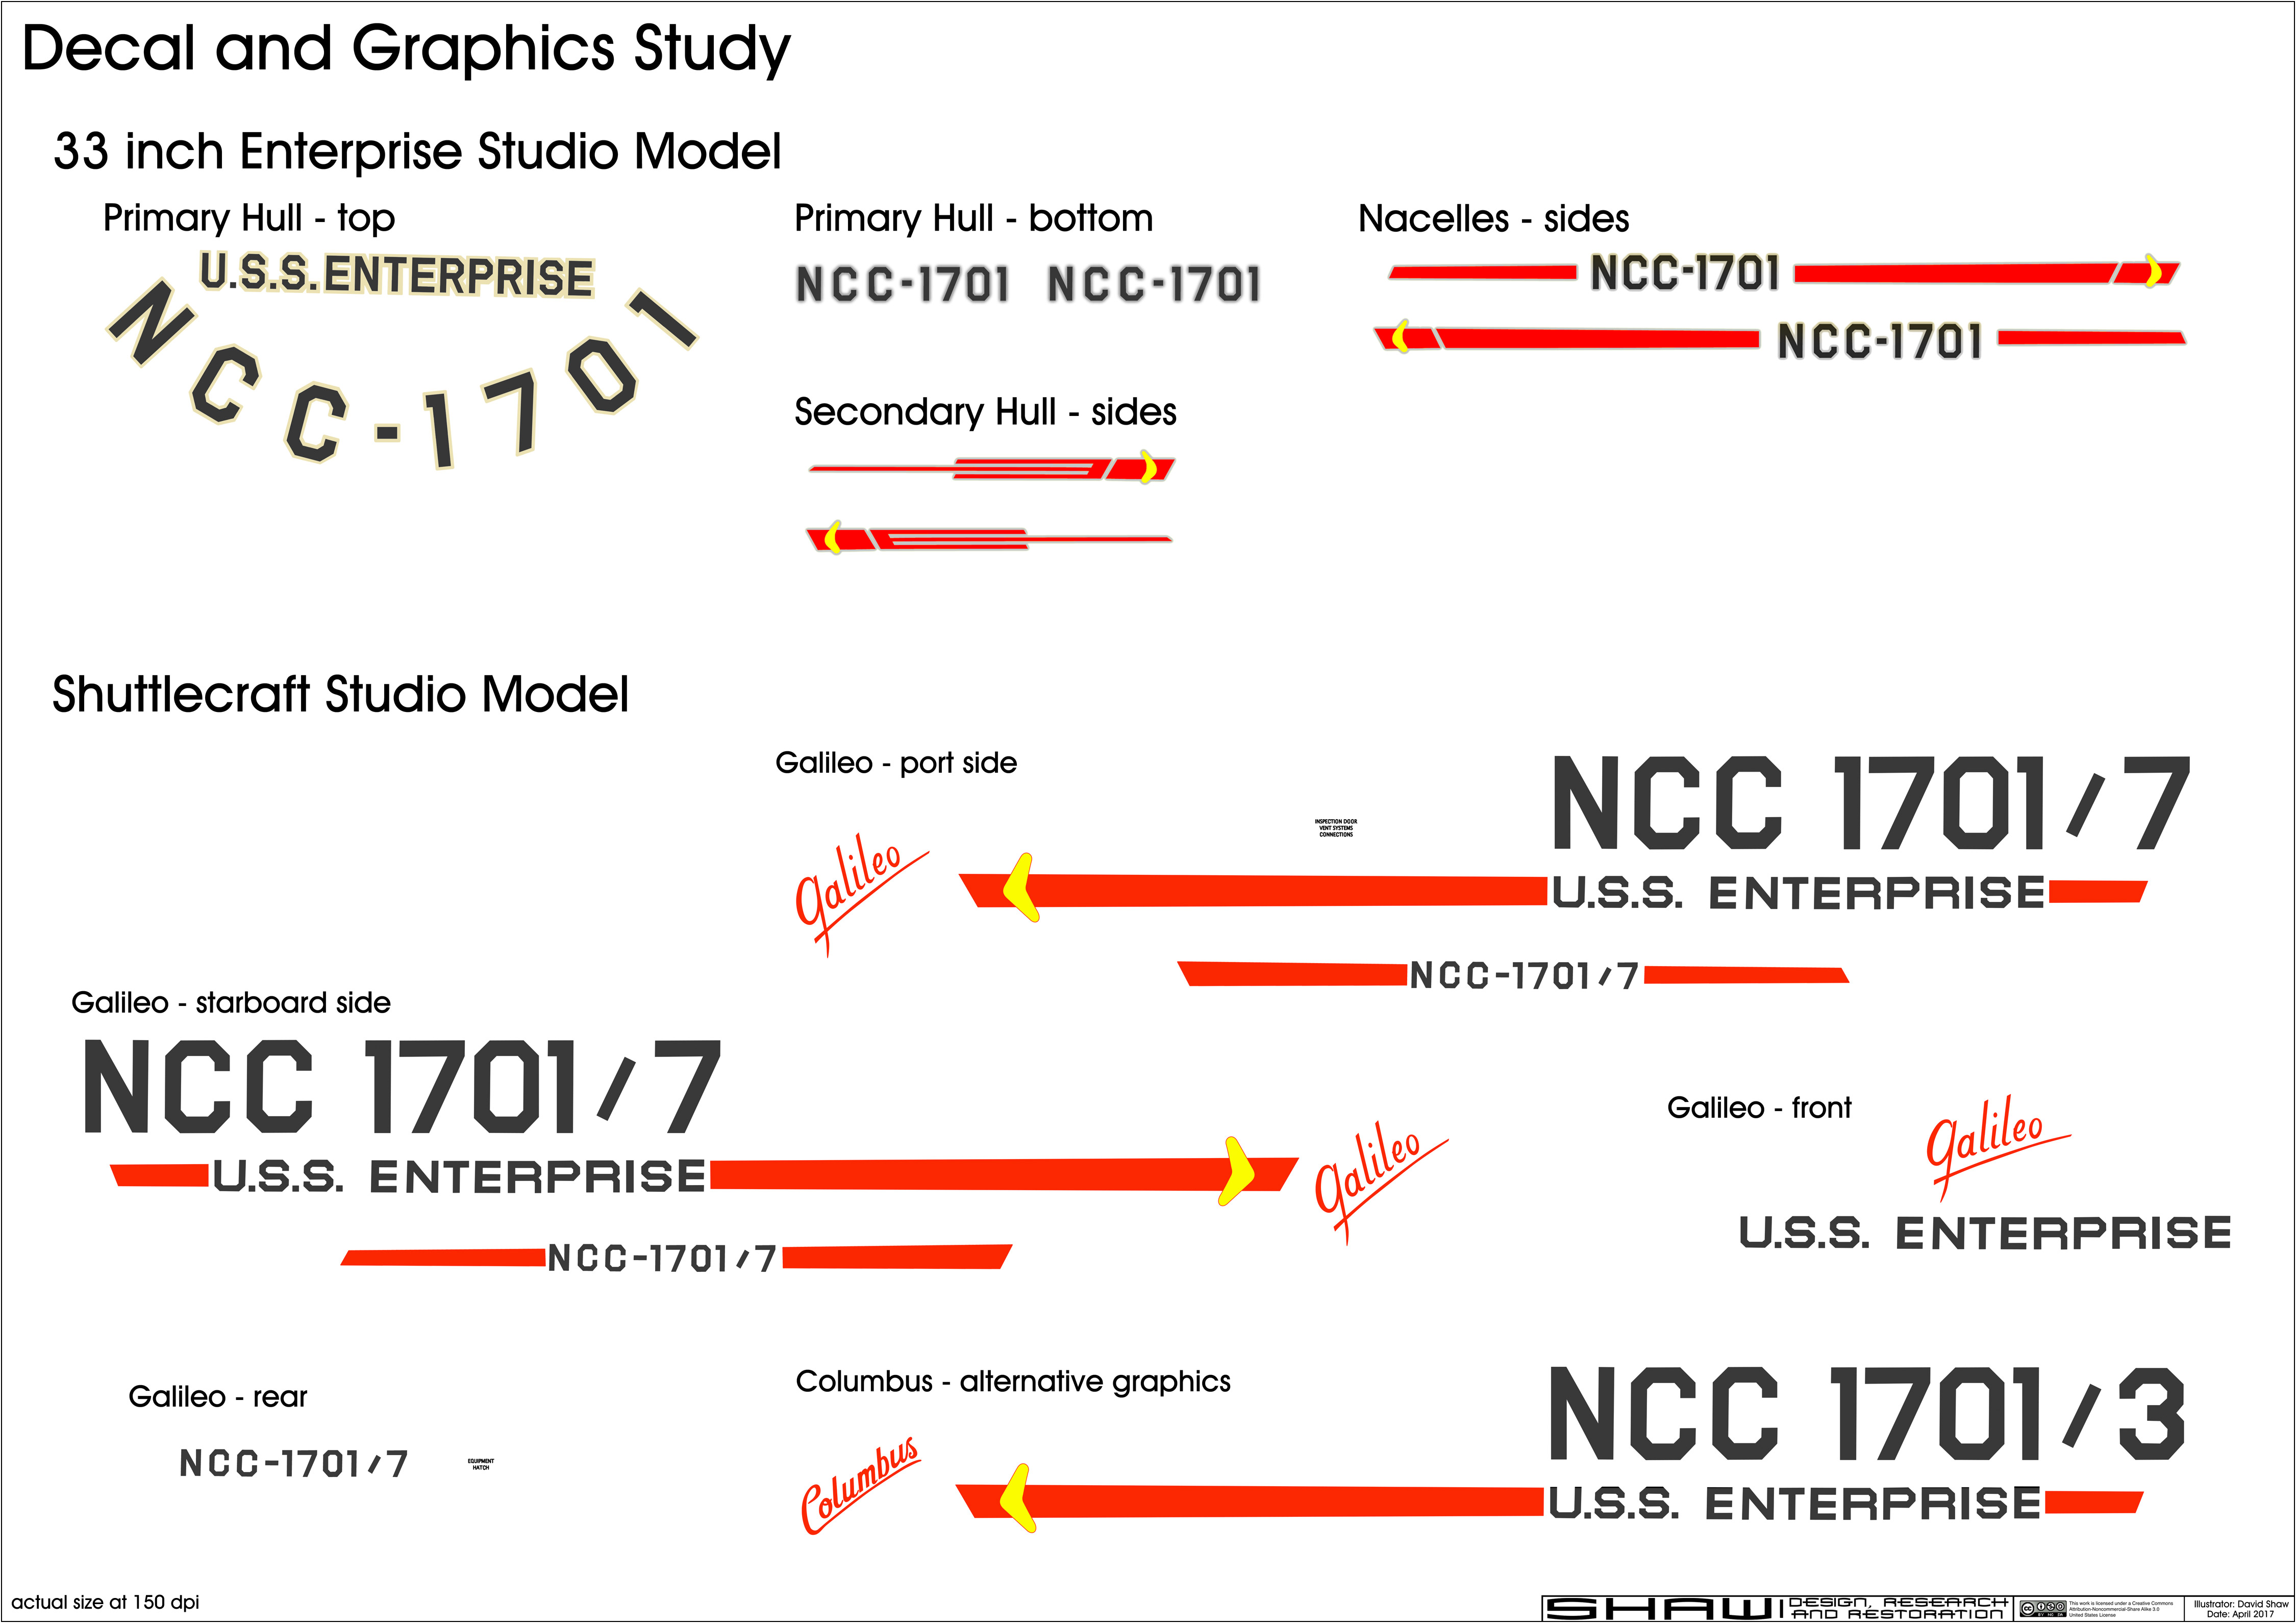
And the new placement study based on the original decals and new photo of the starboard side...
Click to enlarge
Recently I've been putting more time in on my research of decal graphics used on the 33 inch Enterprise and Galileo studio models...
Click to enlarge
Still needs some work, but I feel like I'm getting closer to the final artwork.
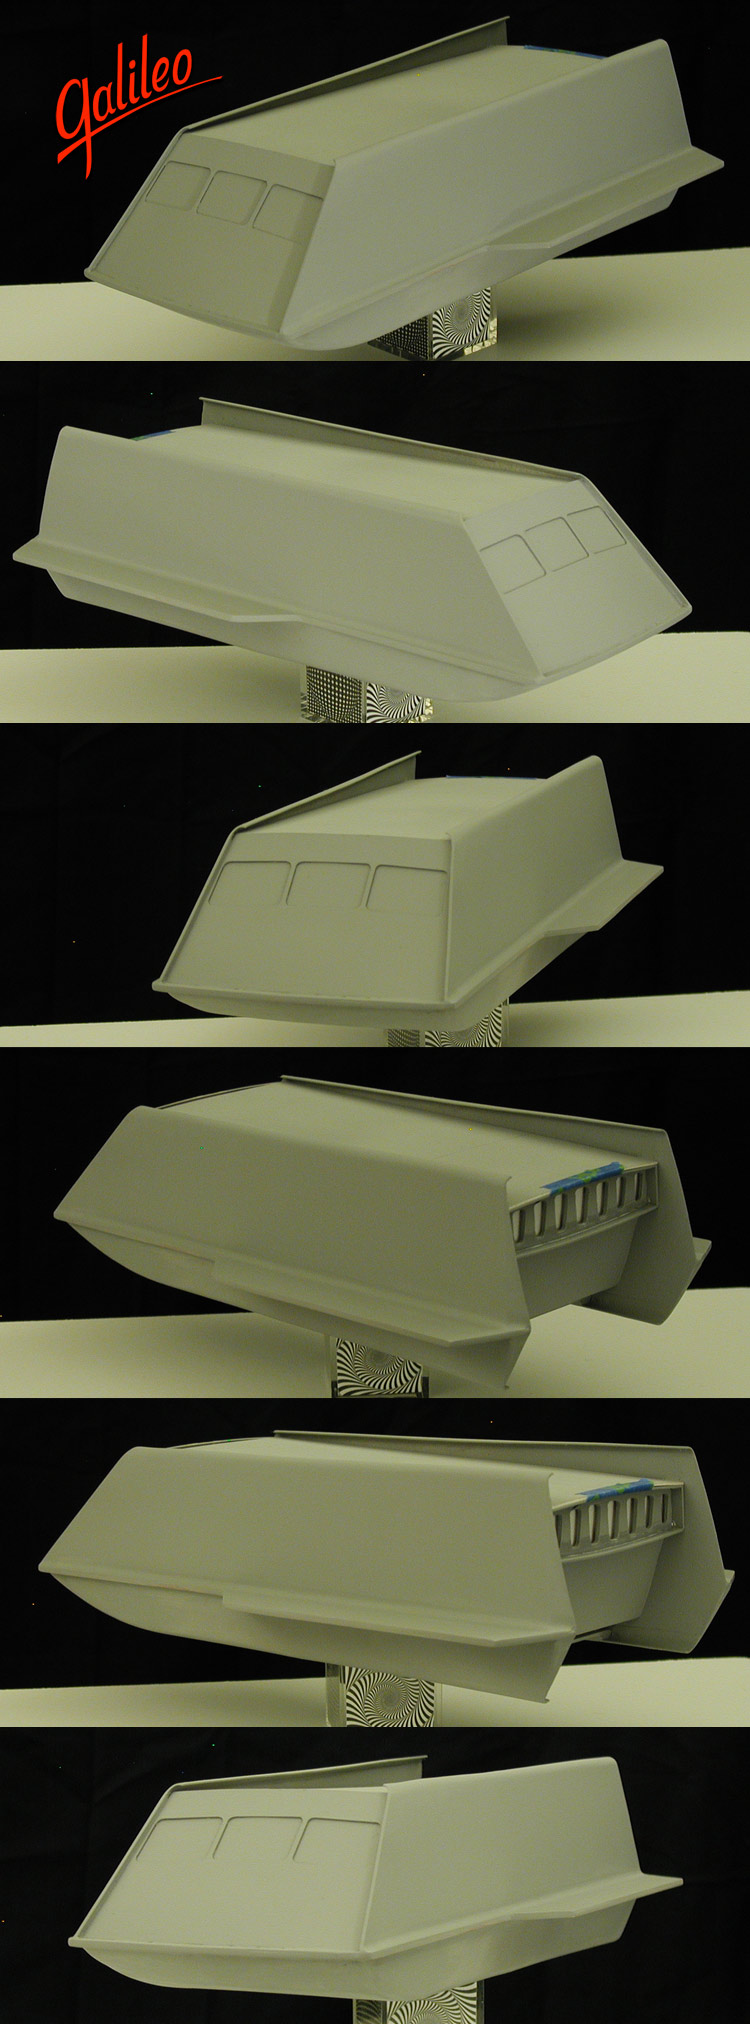
I've also made some progress on the model...
... which has proven to be something of a pain as I don't recall all the corrections I made while building the first one, so practically the only thing I knew for sure to correct was the errors that were still visible in the final model. This time around I'm taking better notes so I'll have the ability to make improvements to the plans and templates.
Galileo 2.0
- Shaw
- Legendary LT Commander
- Posts: 189
- Joined: Wed Feb 18, 2015 12:24 am
- Location: Twin Cities, MN
- Contact:
- Tesral
- Administrator
- Posts: 4937
- Joined: Tue Dec 18, 2012 12:58 pm
- Location: Dearborn, Mi -- at my desk.
- Contact:
Re: Galileo 2.0
What is the scale on this?
Garry AKA --Phoenix-- Rising above the Flames.
"I saw it done on Voyager" is no excuse for anything, even breathing.
- MSgtUSAFRet
- Can-Do Captain
- Posts: 531
- Joined: Wed Jun 15, 2016 5:49 pm
- Location: Houston, TX
Re: Galileo 2.0
Shaw, this is gonna be good!
As always, I'm impressed with your near OC level attention to detail! I love it that the decals are so crisp and clean!
Also, are you gonna do the interior, too?
Looking forward to following this thread!
Steady as she goes!
Steve
As always, I'm impressed with your near OC level attention to detail! I love it that the decals are so crisp and clean!
Yeah, do you have a scale mapped out for this thing?Tesral wrote:What is the scale on this?
Also, are you gonna do the interior, too?
Looking forward to following this thread!
Steady as she goes!
Steve
- Shaw
- Legendary LT Commander
- Posts: 189
- Joined: Wed Feb 18, 2015 12:24 am
- Location: Twin Cities, MN
- Contact:
Re: Galileo 2.0
Thanks!
Uh... scale? I'm not really sure.
It is about 1/48 scale to the large scale mock-up, but it is one-quarter scale to the studio model (or one-half scale to the previous build). I'm having to redo a lot of the research/error correction I had done on the first study model back in 2015 because I hadn't made clear enough notes (I thought I'd be starting this a lot sooner than I did).
But yeah, a lot of it depends on what you consider the real world size/scale of the shuttlecraft to be.
As for an interior, not for this model because it is just for basic re-familiarization with the design (which is why it is half the size of the first study model).
That having been said, once I work out the bugs, I'll be building another one at the same scale as my first study model that will include an interior. That interior will be based on my 2004 plans of the interior shuttlecraft set that I had made for Starship Exeter...
As the interior will only be viewable from the front windows, I'll be attempting to replicate this view...
And because it'll only be seen from the front, the interior will be done as a forced perspective (so the rear bulkhead will be the correct shape). Because one-half studio scale is almost the same size as the cancelled Round 2 Galileo model, which was to have been 1/32 scale, I plan on making use of the same figures that they were. And which happened to have been included with the updated bridge model kit...
I've already made the master for the chairs, and did this quick-n-dirty mock-up of the forced perspective interior to make sure that everything would work as intended...
So no interior for this model, but yes for an interior for the model this one is helping me eventually build. And no, this model won't be lit, but yes for the future build (the mock-up showed it was just too dark inside not to light it).
That is the plan, hopefully.
- Shaw
- Legendary LT Commander
- Posts: 189
- Joined: Wed Feb 18, 2015 12:24 am
- Location: Twin Cities, MN
- Contact:
Re: Galileo 2.0
Bit more progress... mostly sculpting the lower half and started in on the engine detail. I also included a test of the decal graphics to get a feel for how they'll integrate with the model.
The model doesn't photograph well in this bare styrene stage, but like the first one the details should show up better after I hit it with primer.
- MSgtUSAFRet
- Can-Do Captain
- Posts: 531
- Joined: Wed Jun 15, 2016 5:49 pm
- Location: Houston, TX
Re: Galileo 2.0
Looking Awesome, Shaw!
I have an old AMT kit (same source - abandoned in my brother's garage for 40 years!) that I am hoping to restore. This and your other build thread are quickly becoming my source material - again.
The decal look spot on. Did you use the same font for these as you did for the '64 AMT Enterprise- the one you developed from tracings of Matt Jefferies' font? If so, RADICAL! (dated?! Dunno.)
Great build so far! Staying tuned!
Steve
- trekriffic
- Admiral of the Fleet
- Posts: 2746
- Joined: Mon Oct 01, 2012 4:16 pm
Re: Galileo 2.0
You are a font of knowledge Shaw. Your posts are always informational and well constructed. Just like your models.
"You broke your little ships."
My albums on flickr: https://www.flickr.com/photos/29607470@N08/sets/
- Shaw
- Legendary LT Commander
- Posts: 189
- Joined: Wed Feb 18, 2015 12:24 am
- Location: Twin Cities, MN
- Contact:
Re: Galileo 2.0
Thanks guys!
A quick pass with primer to help with spotting flaws that still need work...
- Shaw
- Legendary LT Commander
- Posts: 189
- Joined: Wed Feb 18, 2015 12:24 am
- Location: Twin Cities, MN
- Contact:
Re: Galileo 2.0
This is a test with the wing section and nacelle support...
Still a ton of work to be done, but it is progressing.
I've also been playing with the idea of what a commercial/private version might look like based on Thomas Kellogg's concept art...
Click to enlarge
I was considering what both an interplanetary (no nacelles) and interstellar (nacelles like the Aurora from TOS) version might look like.
- Shaw
- Legendary LT Commander
- Posts: 189
- Joined: Wed Feb 18, 2015 12:24 am
- Location: Twin Cities, MN
- Contact:
Re: Galileo 2.0
Some shots after more primer/puttying...
Nothing is glued in those shots, the model is just set/taped together.